Those who frequent Twitter will have likely seen their favorite Japanese BL artists sharing their artwork with a little text/QR code. For those who’ve wondered what the heck the code is for, it’s for a trend that’s becoming more and more common in recent years: Net Prints!

Net Prints (ネットプリント or ネプリ/ネップリ) is the shortened version of Network Prints (ネットワークプリント). This is a feature where you can upload images to the networks of various conbini (コンビニ, or convenience stores), and then print them for the standard printing fee at your leisure next time you’re there to buy a snack or pay your bills. They’re most commonly shared through Lawson and Family Mart, which appear to share the same network and are thus particularly convenient. Originally intended to make it easy to print personal photos without having to bring in an SD card or flash drive, it’s instead become popular within fujoshi fandoms as a way to share and disseminate artwork for postcards, prints, polaroids, and stickers of your favorite characters and fandoms. Being able to share physical artwork and prints with fellow fans used to be something artists could only do at doujinshi events, but with Net Prints if they share the code, the artwork can be printed nationwide with no extra effort necessary on the part of the artist.
While this used to be mostly relegated to fanart, over the last year it’s been exploding in popularity with commercial BL artists and publishers as well. Net Prints have become a really fun addition to pretty much anything worth celebrating: artists will post them when they release a tankoubon, or when a reprint or continuation is announced, or when a drama or anime adaption is coming out, etc. During the announcements for ChillChill BL Awards, tons of artists were posting Net Prints to celebrate placing in the finals, so you bet I spent my evening after work at Family Mart inputting code after code to enjoy nice, glossy photo prints of all my favorite BL mangaka’s artwork.
Thus, since these are becoming so commonplace, and since tourism in Japan is booming again now that travel restrictions have been lifted, I wanted to do a little how-to explainer on Net Prints for those who intend to come to Japan for travel or an extended stay, or for those who’re just curious what the heck the damn code artists keep sharing on their artworks is. I really love the culture of Net Prints, since it’s such a wonderful by-fans-for-fans inexpensive method of art sharing, so I’d love if more people were able to enjoy and appreciate them.
First, a short introduction to the printers Net Prints are done on:
Printers at Japanese convenience stores are nothing short of amazing. They’re essentially a one-stop shop for printing lotto tickets, concert tickets, passport photos, important documents, package slips, invoices, class reports, faxing, copying, scanning—you name it. Because they know people might need to print highly personal or confidential documents, the screen is tinted for privacy so you have to be looking directly at it to see the contents. (This works out in your favor if you’re printing some particularly risqué artwork…  ) The printing cost depends on the final product—photos are 20~80 yen per image, documents can be as low as 5~50 depending on if they’re color or black and white and what size paper is being used, and stuff like stickers are around 200~400 per sheet.
Now, the how-to! Only after going through all this did I realize there’s actually a button at the top that changes it into English…  But honestly, sometimes even the English translations are kind of sus and confusing, so yolo, we’re still doing this.
Thankfully, Kazu Akizuki actually posted Net Prints celebrating the drama CD of Would You Let Me Support You With Money and Love? -Lessons About Pleasure With the No.1 Host- (very cute story, highly recommend) so I’ll be using those as an example!
You can also see from her Tweet that she provides the three pieces of information you’ll generally need for Net Prints:
→ User code (ユーザー番号) or QR code
→ Store they can be printed at
→ Expiration date and time (when the images will be deleted from the network)
These are for Lawson and Family Mart; as I noted previously, these two stores appear to share the same network and are thus the most common. The user code is “8NHN3B2XC3” but she also provides the QR code for easy access (this has become more common recently). The images will automatically be removed from the server by 8PM on June 13th, so make sure to print them before the time is up!
So I’ll walk you through printing these!
1.
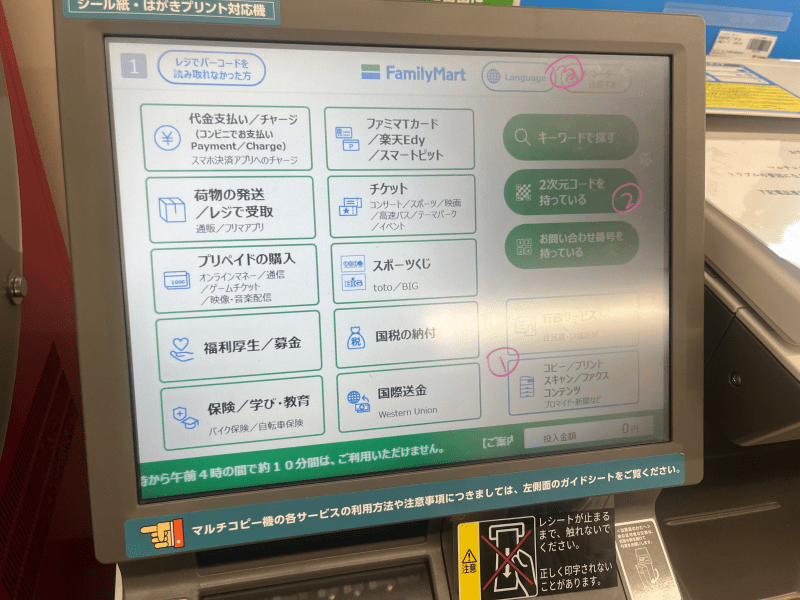
This is the main screen of a Family Mart printer. Sometimes each printer has a slightly different screen layout, but generally speaking you’ll want to go for whatever says print (プリント). On this screen:
① This is the print button! All the other buttons to the right are for various other things you can do with the printer and can be ignored!
② This is the fast and easy way to access the prints if you have a QR code! With this, you can skip all the way to step 5.
③ You can change the language! I didn’t realize this until after! It might be useful!
For our purposes, you press the “print” button!
2.
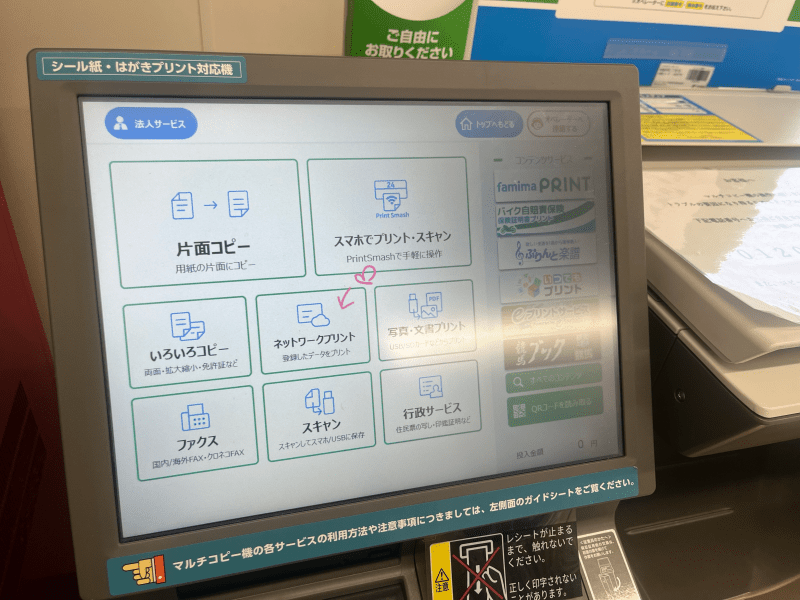
From the “print” page, you want to click Network Print (ネットワークプリント) right at the center!
3.
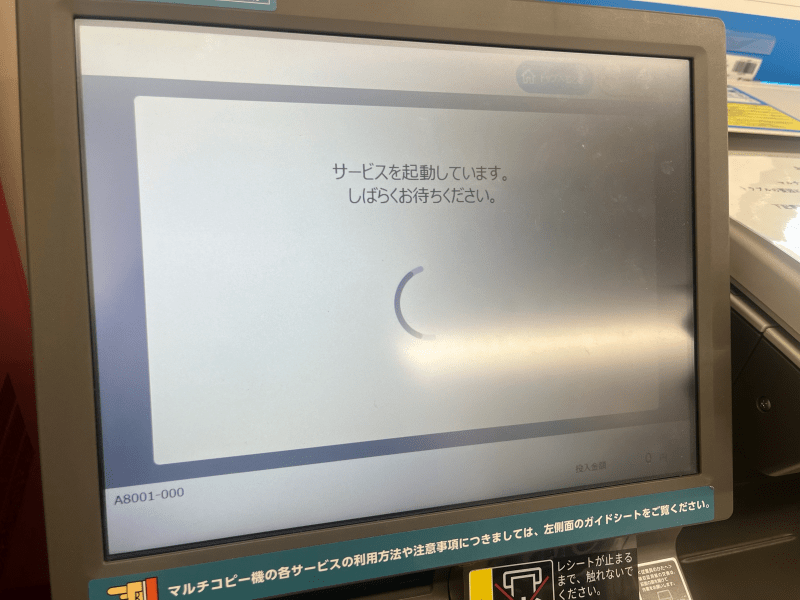
Buffering…
4.
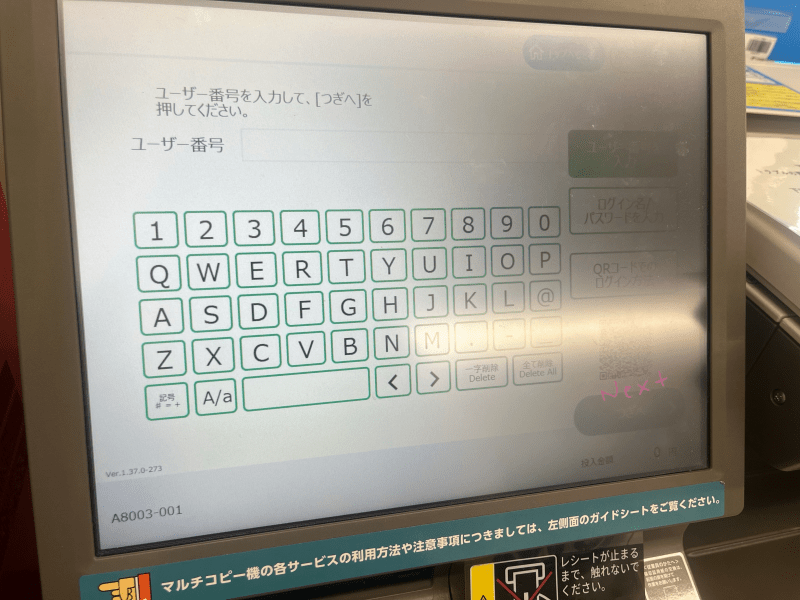
This is the User Code page. You type in the code the artist has provided, and then hit “next” in the bottom corner. If you use the QR code, you can skip all the way past this part.
If an artist’s code has expired without you realizing, or if they’ve removed the images for whatever reason, you’ll get a pop-up saying there are no images attached to the code anymore. RIP.
5.
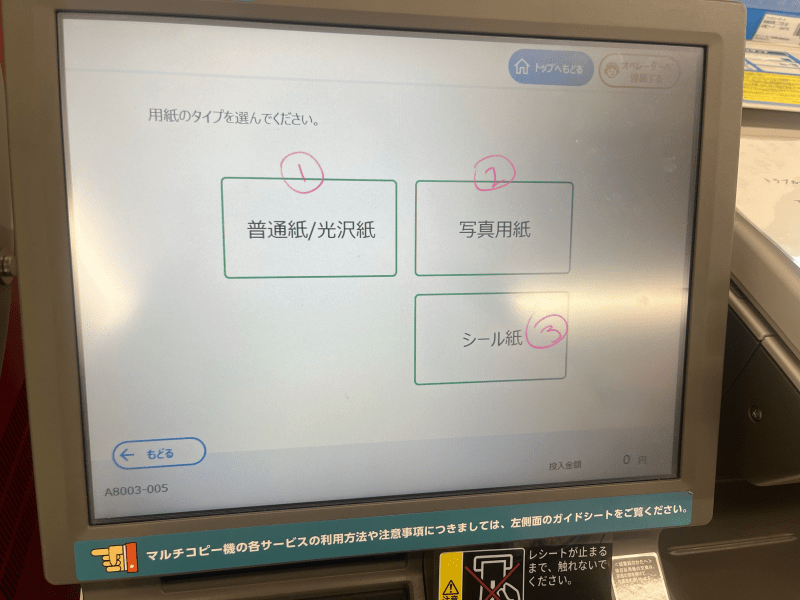
Once you’re in, you have the following options:
① Print on regular paper
② Print on photo paper
③ Print on sticker paper
For most purposes, you’ll be using the photo print unless the artist specifies it’s a postcard or sticker sheet. (For instance, the HANASAWA NAMIO prints I posted in the intro are specifically meant to be stickers.) However, any image can be done on any of these types of paper. For instance, if an artist posts a really beautiful print of your oshi or fav ship and you want to use it to decorate your laptop, you can print it as a sticker. If you want it to cost less, you can print it on normal paper. Just know the artist often optimizes the image for a specific type of paper, so how nice it looks on the other types may vary.
For beautiful photo prints, pick ②.
6.
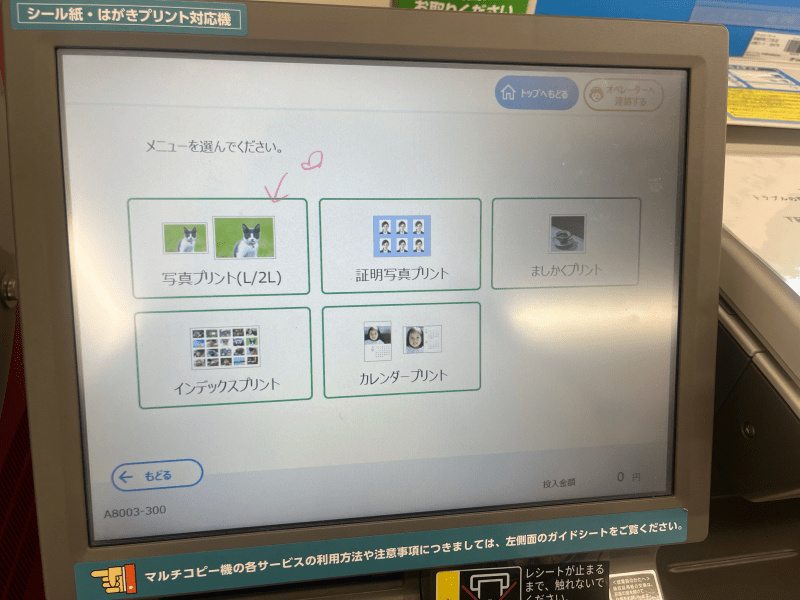
I put these two steps together since they’re essentially the same thing.
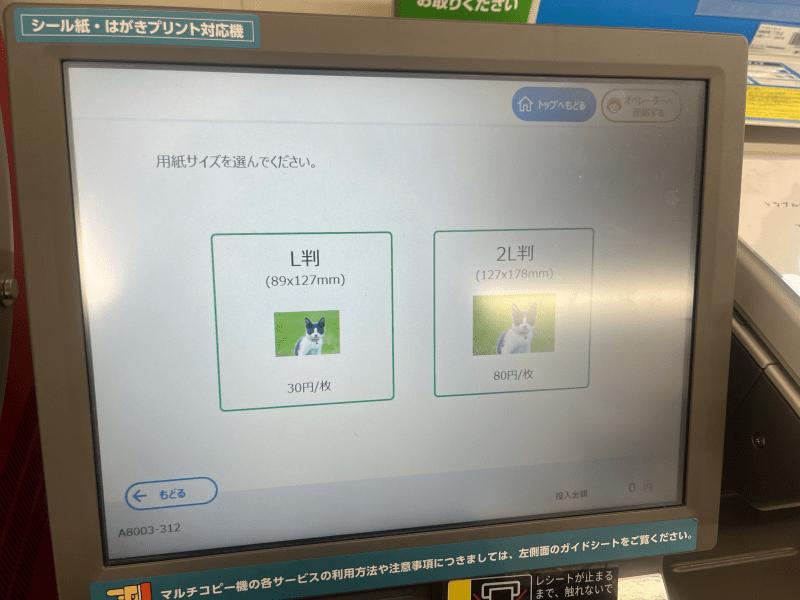
In the first screen, you want to click photo print, meaning you want to print each image singularly on its own sheet. The other options are to use the image to create different formats, such as collages, calendars, passport, etc.
In the second screen, it’s asking what size you want. Sometimes an artist specifically formats their image to fit a specific size, so be careful to check if they specify L or 2L. For instance, with the Tulle 20K followers celebration Net Prints, they specify to print them in 2L since you’re supposed to be able to cut them into Polaroid size.
Usually you can print in either size!
7.
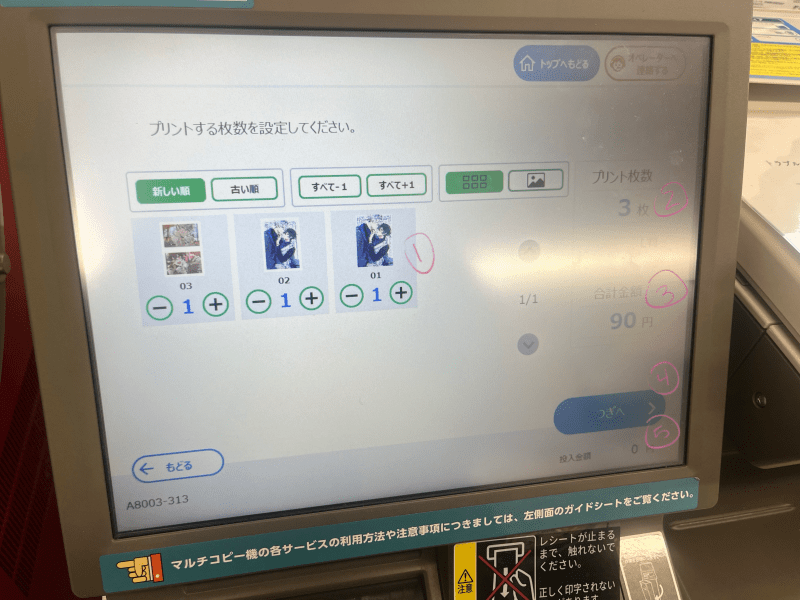
Once you’re done selecting your paper type, print style, and size, we can move on to the actual images! Kazu Akizuki graciously posted three, and as I’m not someone to look a gift horse in the mouth, I gladly printed all of them.
① This is the amount for each image posted under the code. This starts at zero, so you’ll need to increase it for each image you want.
② The number of photos you’ll be printing
③ The overall cost of printing the photos
④ “Next”
⑤ The amount of money inserted into the machine
So, after this, I had to insert a 100 yen coin into the printer in order to print my 90 yen worth of images.
8.
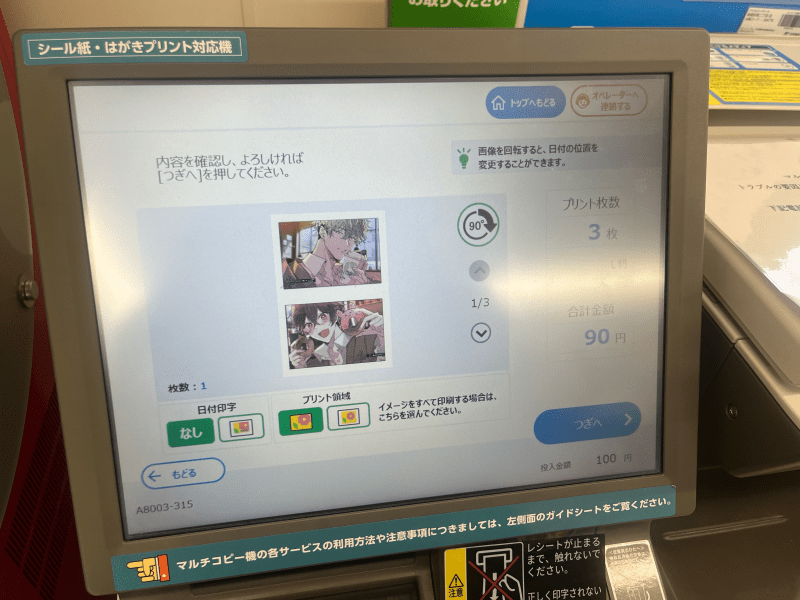
This page is pretty much just a confirmation page. You can flip through your photos to make sure you didn’t accidentally add anything you don’t want. You can also add a date (日付印字) or choose how to center the photo (プリント領域) if you so desire, but it’s usually best to leave these in the default setting.
9.
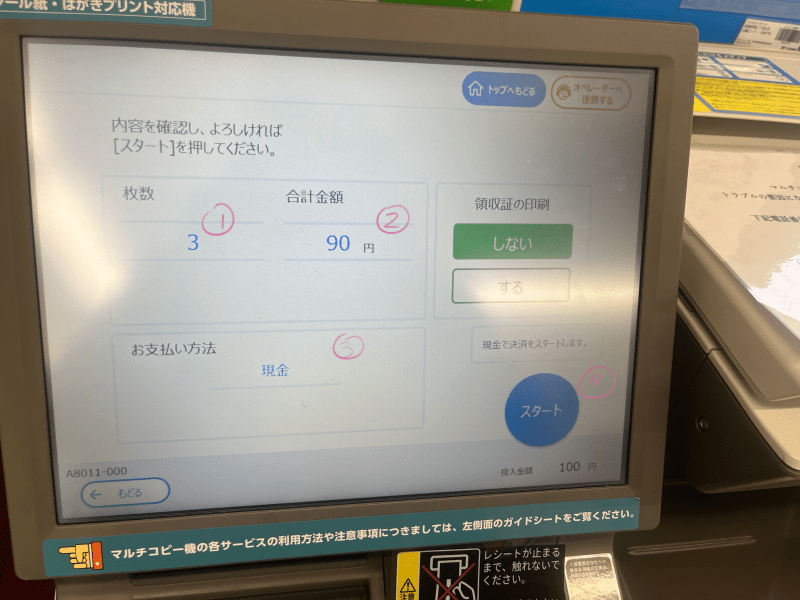
Another confirmation page!
① Number of photos
② Overall cost
③ Payment method (cash)
④ START!
Finally, once you’ve confirmed everything, you can start printing!
10.
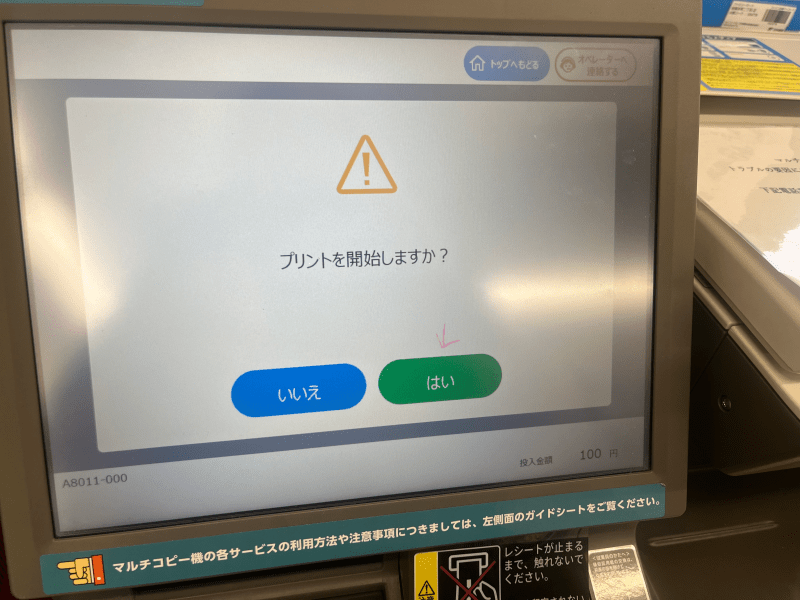
Just kidding! One more confirmation page!
10.5.
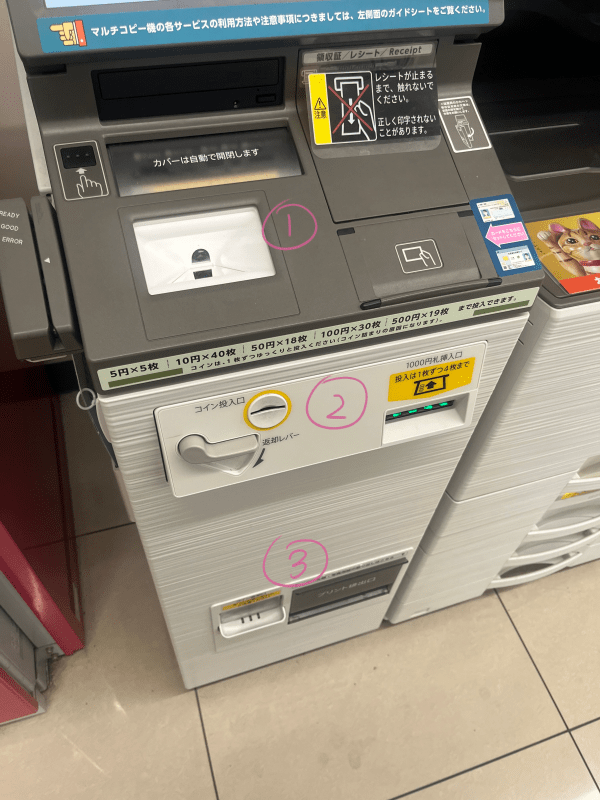
I guess this would be as good a time as any to show the actual body of the printer:
① This is where you scan the QR code
② This is where you feed the money
③ This is where you accept your change and photos
11.
The wait screen. Photo prints usually don’t take too long (maybe 30 seconds per photo) but stickers tend to take a bit longer. I’ve never printed a postcard at Family Mart (only at 7-ELEVEN) but I can only assume they don’t take any longer than photos.
12.
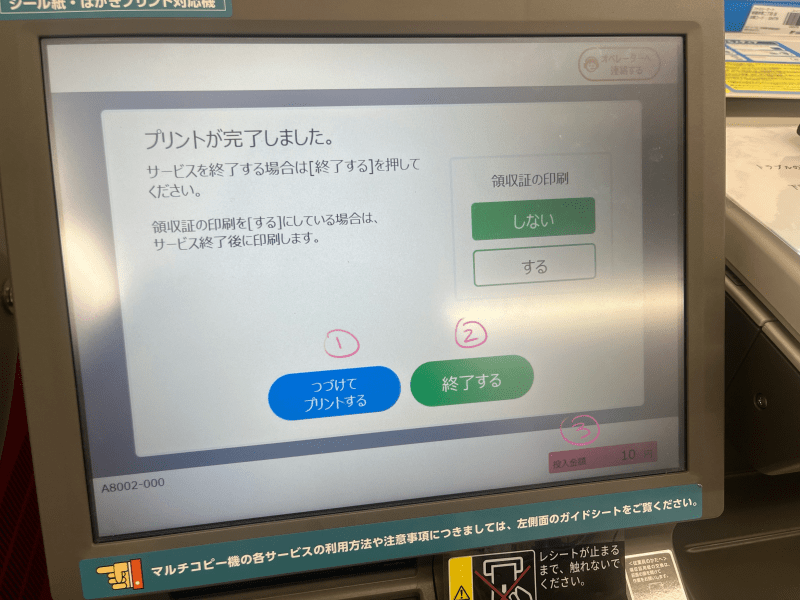
Aaaand you’re done! Your choice at the bottom depends on if you have more you want to print:
① Continue printing
② End session
③ Leftover change
The “continue printing” is a bit misleading, since this is only for continuing with the current code. For instance, if you now want to go back and print stickers instead of postcards of the same images, you’d click this button. If you want to keep printing but need to input a different code, then you’ll have to end your current session and start front the main screen again.
If you’re actually done printing, period, don’t forget to collect your leftover change and your prints!

Very, very cute. Thank you for the wonderful treat, Kazu Akizuki!
When collecting your photos from the dispenser, if you printed anything particularly risqué be careful that it’s not too visible to anyone who might be standing around you. When Kaoru Watanabe posted her J.GARDEN tokuten for Net Prints she was careful to add the warning “watch out for who might be behind you!”
When we were discussing this BLog post during our team meeting while looking at the B+Library Net Print catalogue, our own dear Takochan asked “…aren’t those embarrassing to print in public?” But they don’t have to be—the screen is only visible to you and the photos stack in their little private print dispenser, so there’s not really anything to be shy about. People expect to see all walks of life at the conbini, and being a fujoshi isn’t seen at that shameful in Japan anyway, so no one’s going to care what you’re printing. I’m sure they’ve seen way worse standing next to random ojisan on public transit. Still, it’s polite to not flash the boy tiddies around too much.
Anyway, those are Net Prints! I hope I’ve helped you understand what the heck those codes all the artists post are for. Perhaps this is something you can look forward to if you plan on visiting Japan sometime in the near future, or if you even live here but have been too shy to try printing any. I have an absolutely absurd amount of art prints and stickers from so many BL artists I really love, and they’re shared with absolutely zero benefit (financial or otherwise) to the artist so they’re truly just a sign of love and appreciation to fans and followers. Being able to print them at the conbini is incredibly cheap and convenient, and is a massive service to otaku everywhere.
tl;dr Net Prints for life.

One thought on “Net Prints: The Why & How of This Fujoshi Fandom Phenomenon”